Table of Contents
Overview
SIP Caller connects to your phone system as a remote extension. You could think of SIP Caller as a phone that connects to the PBX to make calls.
SIP Caller operates from the cloud. This means that it will connect to your Phone System from a public IP address (which might change depending on your location), and this might require some configurations depending on the location of your Phone System.
Phone System in the cloud
This is the most common case nowadays, and the simplest scenario to integrate SIP Caller with your Phone System. In this case, both endpoints (SIP Caller and the Phone System) are in the cloud, and that means that there are no firewalls between them, except by the firewall running in the Phone System itself. The connection in this case is straight forward. You will just need to configure SIP Caller with the public IP address or Host Name of your Phone System, and eventually add the SIP Caller IP addresses white listed in your Phone System firewall. No additional configuration is needed.

Phone System on-premise
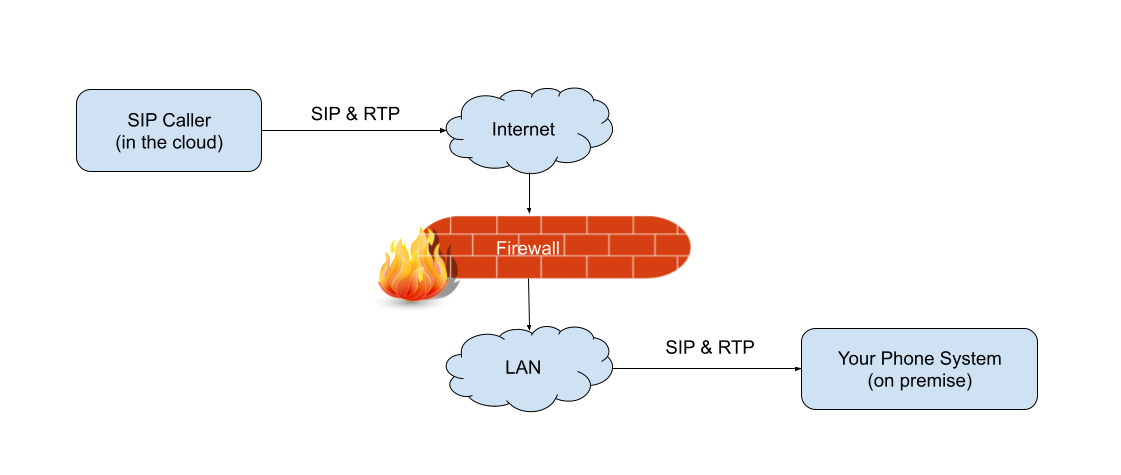
The global trend is that users are moving their Phone Systems to the cloud, so this scenario is becoming less common every day. However, some companies still prefer to have their Phone Systems on-premise. If this is your case, your Phone System will be behind a firewall, and you will need to configure this firewall to allow the incoming SIP and RTP traffic from the cloud to your Phone System server. You probably already have this inbound rule traffic open for your SIP Trunk, but you might need to enable the IP addresses of SIP Caller as well.
Set up the connection
Required roles
In order to create or edit a Phone System, the user needs one of the following roles:
- Administrator
- Operations Manager
- Phone Systems Manager
In order to view a Phone System, the user needs one of the following roles:
- Account Reader
- Operations Reader
Register your Phone System
SIP Caller connects to your Phone System as a remote extension. Therefore, in order to use SIP Caller with your Phone System you will need to create an extension for it, and then obtain the SIP credentials.
To set up the connection to your Phone System:
- Login to the management console, and go to “Phone Systems” > “Register”.
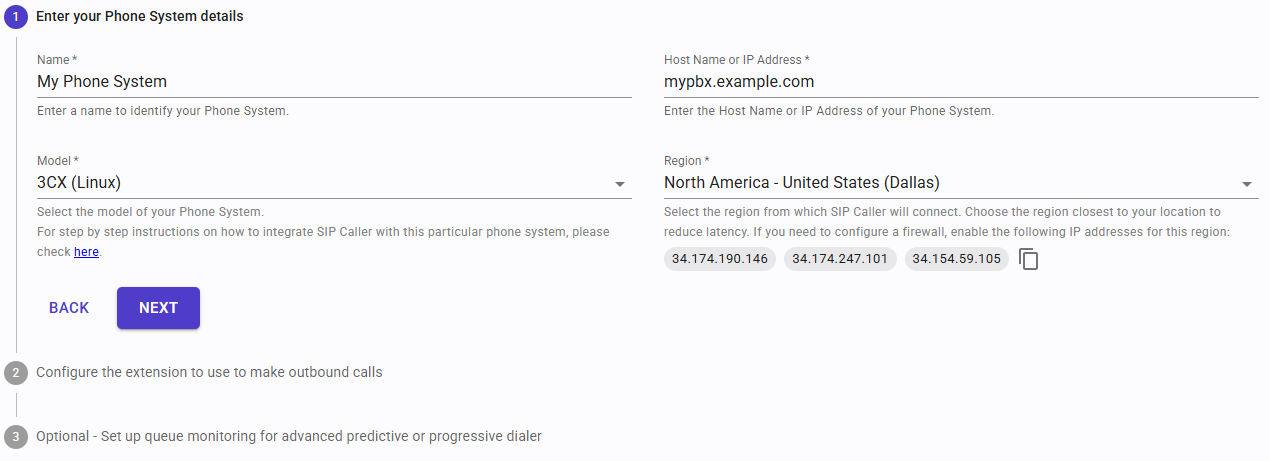
- Enter a name to identify your Phone System.
- Select the model of your Phone System.
- Specify the Host Name or IP address of your Phone System.
💡 Tip: if your Phone System is using a port number for the SIP protocol different than 5060, you can configure this using the colon (:) separator, for example: mypbx.example.com:5061 - Select the region closest to your location. At this point, SIP Caller will show the list of IP addresses that might be used to connect to your Phone System. Copy these addresses so you can whitelist them in your firewall in case of need. Click “Next” to continue.
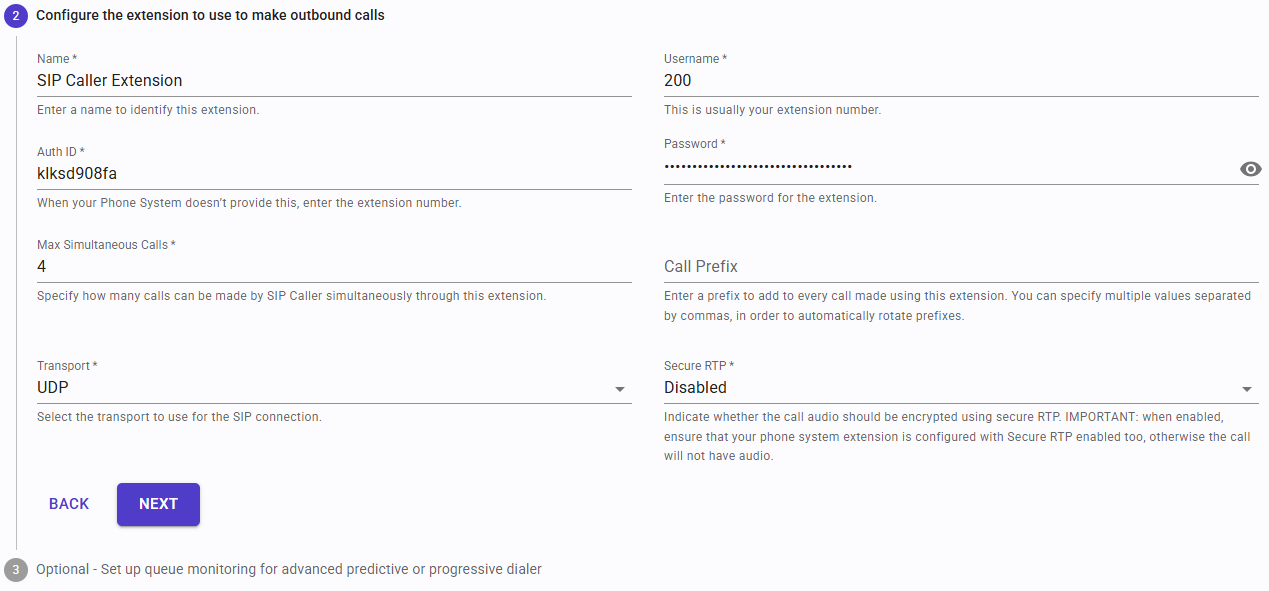
- Now you need to enter the details of the extension that you will use with SIP Caller:
- Name: this is to identify the extension.
- Username: this is the extension number.
- Auth ID: some Phone Systems generate an authentication ID for your extension, which might be different from the extension number. If your Phone System doesn’t provide this, then you will probably need to enter your extension number here as well.
- Password: this is the extension’s password.
- Max Simultaneous Calls: you can specify a limit to the number of simultaneous calls that will be made using this extension. This is to avoid exceeding your Phone System license limits, if any, or the number of lines you have available to make external calls.
- Call Prefix: this optional parameter lets you specify a prefix that will be added to all calls made through this extension. You can specify multiple values separated by commas, in order to automatically rotate prefixes. This technique allows you to use different routes, trunks or Caller IDs in your Phone System when making calls. You can specify up to 32 different prefixes, each up to 6 characters long (valid characters are digits from 0 to 9, *, # and +).
- Transport: select the SIP Transport to use with the extension (UDP, TCP or TLS). The recommended transport is TLS when your Phone System supports it, so messages are encrypted.
- Secure RTP: indicate whether the call audio should be encrypted or not. Enable this only when your Phone System expects the client to use Secure RTP. If this setting is Enabled and your Phone System is configured to use plain RTP, the call will not have audio.
- Click “Next” to continue.
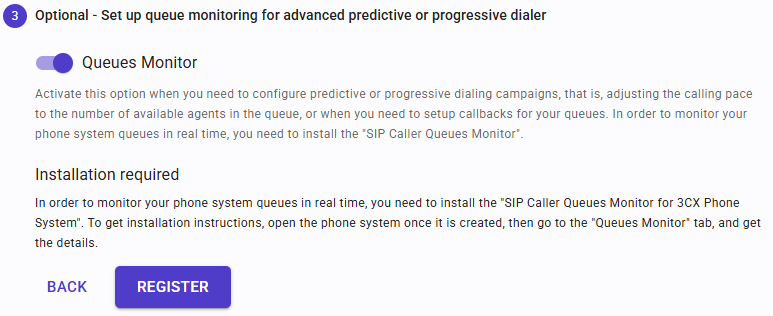
- If you need to run campaigns in “Predictive Dialer” or “Progressive Dialer” mode, or setup callbacks for your queues, enable Queue Monitoring for this Phone System. This requires that you install the “SIP Caller Queues Monitor” module in your phone system server (formerly “SIP Caller Proxy”). This is not required to run campaigns in “Power Dialer” mode. This module monitors the phone system’s queues in real time, reporting the status of each queue to SIP Caller, so it can decide when to make calls. This feature requires the Enterprise plan.
- Click “Register” to finish the registration procedure.
The number of Phone Systems you can register in your SIP Caller account is limited according to the plan you choose. However, you can add as many extensions as you need to a single Phone System.
Add Extensions to an existing Phone System
You might want to configure SIP Caller with multiple extensions in your Phone System. This could be useful for example to run some campaigns using an extension, and other campaigns using a different extension. This could provide the following benefits:
- Get usage statistics for each extension from your Phone System.
- Use different Caller IDs when making calls for different campaigns.
- Configure different routing (for example select a different SIP Trunk) when making calls for different campaigns.
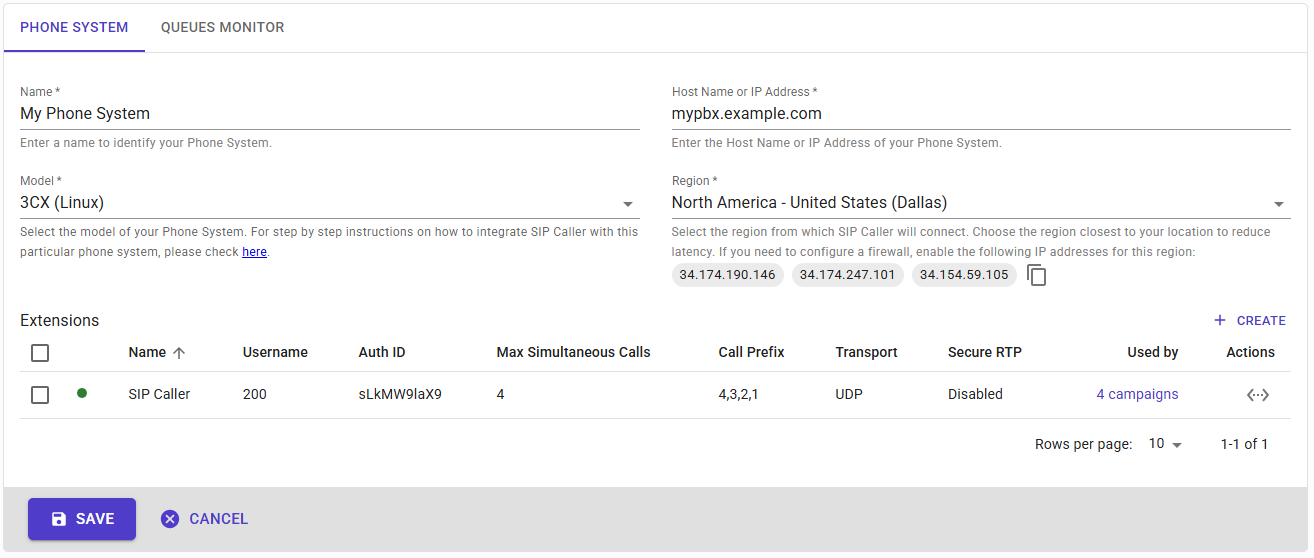 To add extensions to your Phone System, go to the “Phone Systems” section in the management console, and click the Phone System you want to edit. Then add the extension by clicking “Create” in the “Extensions” section.
Queues Monitor
When you need to run campaigns in “Predictive Dialer” or “Progressive Dialer” mode, or setup callbacks for your queues, queue monitoring must be enabled. This requires that you install the “SIP Caller Queues Monitor” module in your phone system server (formerly “SIP Caller Proxy”). This module will report the status of the queues in real time.
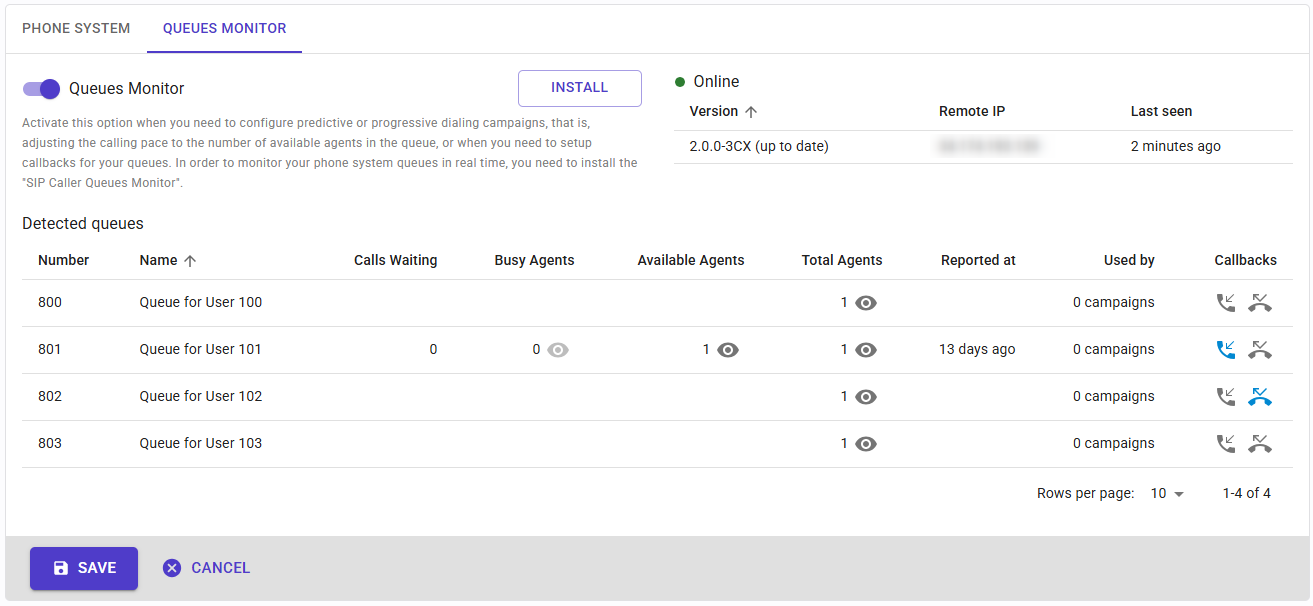
In order to install the “SIP Caller Queues Monitor” module, click on the “Install” button to show the instructions dialog, and then follow the step by step instructions provided. As part of this procedure, you will need to create an API Key which then needs to be configured for the module.
Once the “SIP Caller Queues Monitor” module is installed and running, this section will list the queues that have been detected in your phone system, and these queues will be ready to use in your predictive or progressive dialing campaigns. In addition, you will be able to view the agents for each queue, including their status, and configure call backs for your queues. You can configure 2 types of callbacks:
-
Post Conversation: add your customer’s number to a campaign after they speak with an agent for at least N seconds. Useful to run post-call surveys.
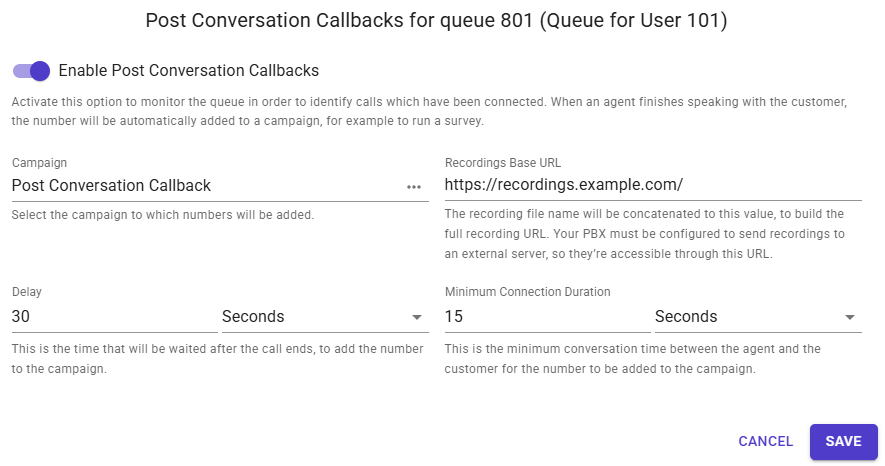 In this case you can specify the minimum talking time to add the number to SIP Caller. This allows you to ignore short calls where the customer might not be able to provide a proper rating. It’s also possible to specify a delay when adding the number to a SIP Caller campaign, to give the user some time after the conversation ends.
 -
Queue Abandonment: add your customer’s number to a campaign after the customer drops the call before speaking to an agent.
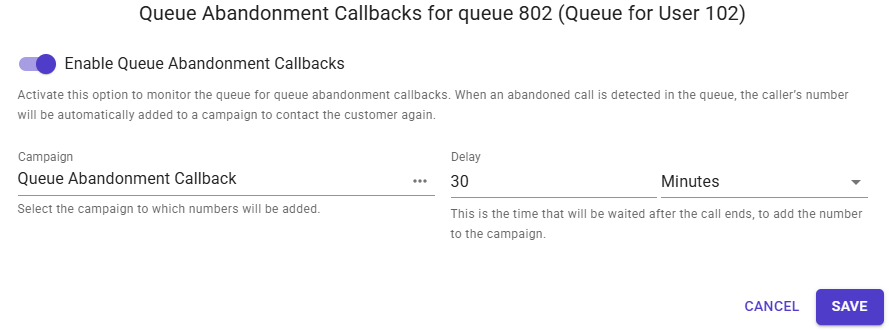 In this case you can specify a delay when adding the number to a SIP Caller campaign, to give the user some time after the original call was dropped.
Phone System specific details
Any Phone System supporting the SIP & RTP standards can be integrated with SIP Caller. We have deeply tested SIP Caller with the following systems, and we provide step by step guides to make the integration a breeze:
- 3CX Phone System ®*
- Asterisk ®* / FreePBX ®*
- Yeastar ®*
* All trademarks mentioned are not affiliated with Easy Caller LLC, its products, or its websites. The owners of these trademarks are not the source of, and do not sponsor or endorse, the products/services promoted here. All product and company names are trademarks™ or registered® trademarks of their respective holders. Use of them does not imply any affiliation with or endorsement by them.
