Campaigns
Create a Campaign
When a campaign is created, it will be pre-configured using the default values you defined in the Campaign Defaults configuration section.
In order to create a new campaign, go to the “Campaigns” section and click “Create”. The dialog will ask for the following information:
General Information
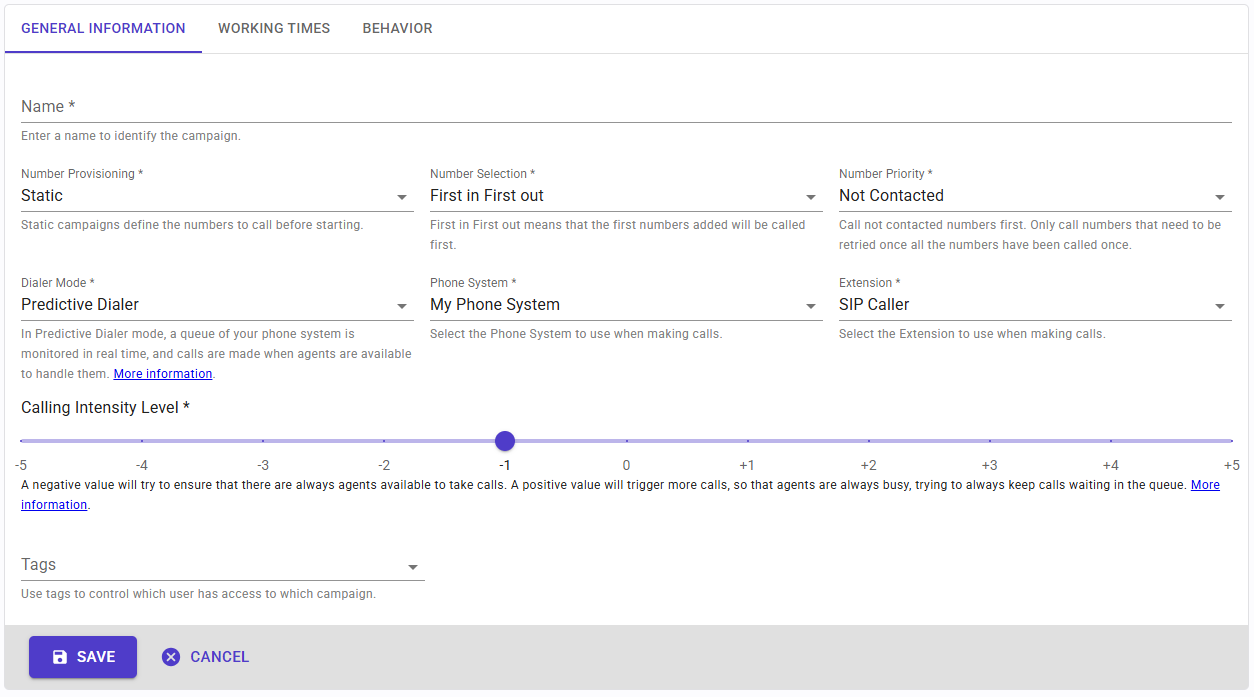
- Name: this is a friendly name to identify your campaign.
- Number Provisioning: if the numbers to call are statically or dynamically defined, i.e. if more numbers can be added or deleted once the campaign is started.
- Number Selection: this specifies the order in which SIP Caller should select the numbers to call.
- Number Priority: this setting lets you choose if you want to call not contacted numbers first, or prioritize retries instead.
- Running Priority: SIP Caller uses this priority to decide from which campaign to take numbers first when making the next calls: numbers are taken first from the campaigns with the highest priority. The priority is a value between -20 and +20, and five of these values have a name: “Max” (+20), “High” (+10), “Normal” (0), “Low” (-10) and “Min” (-20). By default, you choose one of these names from a list. Click the icon on the right of the field to switch to the advanced mode, where a slider lets you choose any value in the range, such as +12. Campaigns with a value that doesn’t have a name always open in the advanced mode, and switching back to the list changes the value to the nearest named one.
- Phone System: the Phone System to use to make the calls.
- Extension: the Extension in the previous Phone System that must be used to make the calls.
- Tags: you can assign tags to your campaign. When you assign tags, only the users having at least one of the specified tags will see this campaign.
Working Times
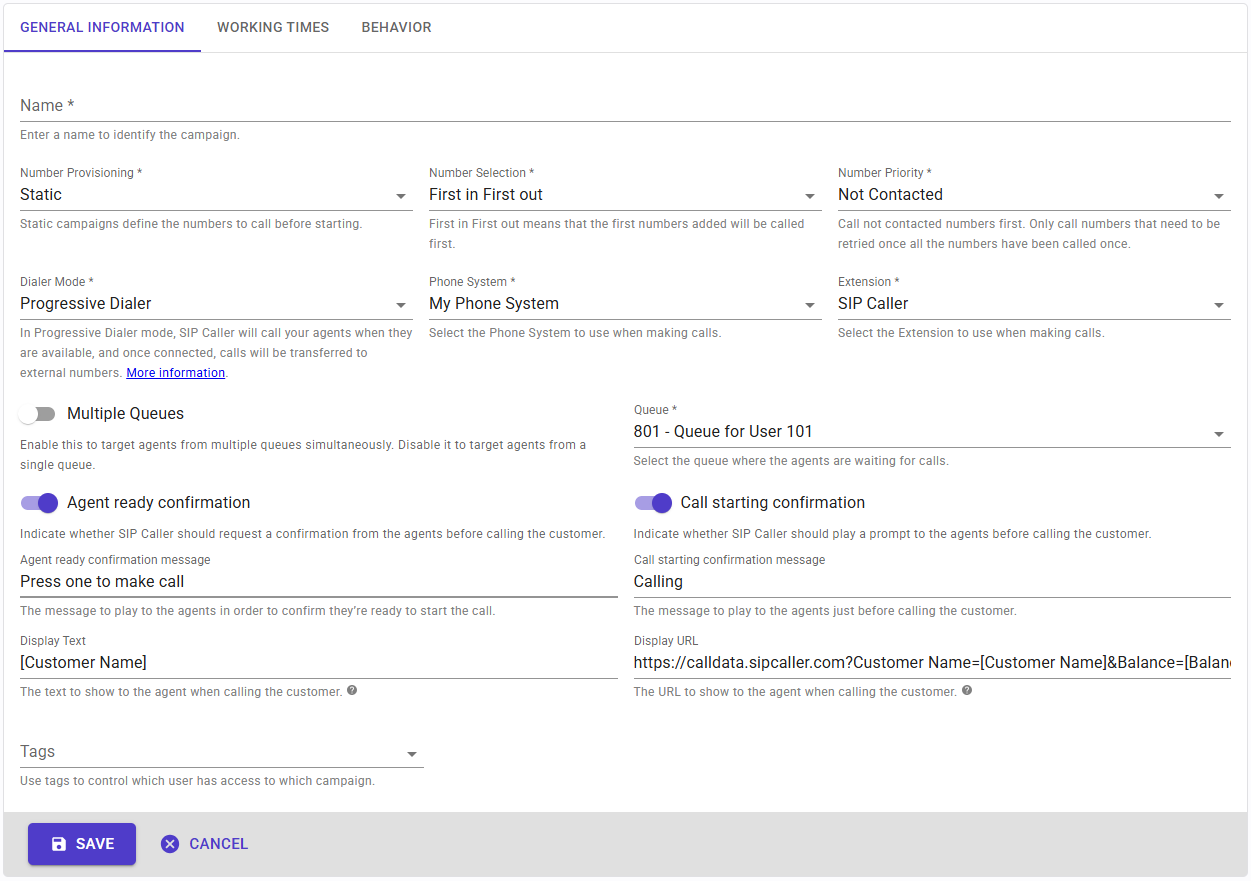
- Scheduled Start Date: this is the date in which you want the campaign to start. This can be the current date, or a date in the future.
- Scheduled End Date: this is the last date in which the campaign should be active (this date included). The campaign can finish before this date if the campaign is static, all numbers are called, and all retries are consumed.
- Holiday Group: you can define which dates should be considered holidays, selecting a configured holiday group. Holidays will use the working times defined for Sundays.
- Time Zone: all the dates and times will be relative to this time zone. In a company having branches in different countries, campaigns can be configured with different time zones.
- Working Times: here you define the time slots in which calls should be made. You can enable or disable blocks of 30 minutes. The configuration can be easily copied from one day to another.
Call Setup
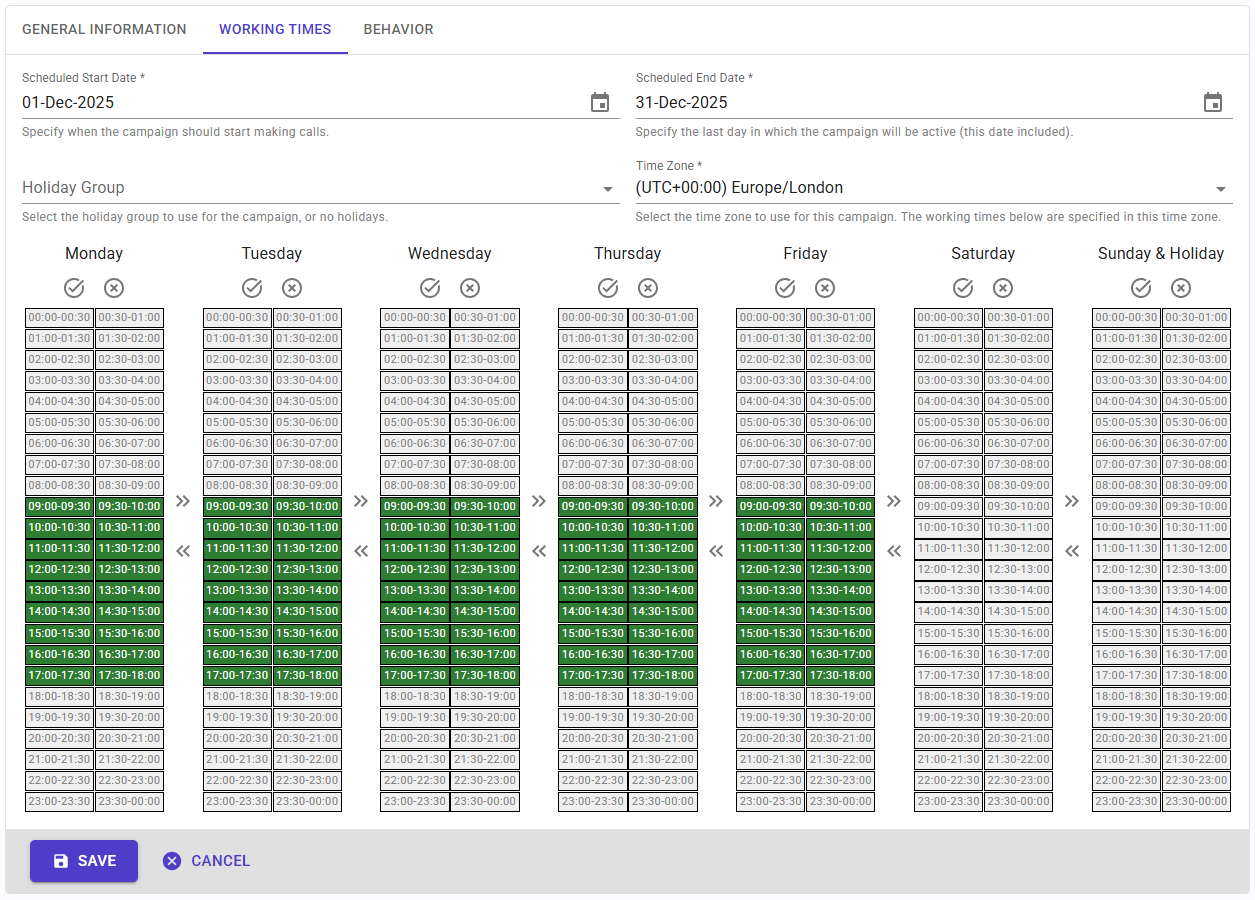
- Call Prefix: SIP Caller will make calls to the numbers you specify. If your Phone System requires a prefix to select an outbound line, then you can specify it here. This prefix will be added to every number before making the call. You can specify multiple values separated by commas, in order to automatically rotate prefixes. This technique allows you to use different routes, trunks or Caller IDs in your Phone System when making calls. You can specify up to 256 different prefixes, each up to 6 characters long (valid characters are digits from 0 to 9, *, # and +).
- Ring Timeout: this is the time to wait for the destination to pick up, before considering that the call attempt has failed due to no answer. When running campaigns in “Progressive Dialer” mode, this timeout applies to the call to the agent. When the external number is called, the agent will be already in the call, and will be responsible for aborting the call attempt after some time.
- Mode: you can choose if you want the campaign to run in “Power Dialer”, “Predictive Dialer”, or “Progressive Dialer” mode:
- In Power Dialer mode, calls are made as fast as possible, trying to cover all available simultaneous calls on your plan.
- In Predictive Dialer mode, the queues of your phone system are monitored in real time, and calls are made when agents are available to handle them.
- In Progressive Dialer mode, the queues of your phone system are monitored in real time, and calls are made when agents are available, but in this case SIP Caller will call the agent first, and when the agent accepts the call SIP Caller will initiate the call to the external number.
- Black Lists: you can configure one or more black lists of numbers that should not be called. Black lists are defined from the Settings section.
- Calling Intensity Level: this option will only be shown when the mode is set to “Predictive Dialer”. With this option you can adjust the predictive dialer behavior, instructing it to make more or less calls, depending on whether you prefer to keep agents always busy, even at the cost of having customers waiting on the queue, or ensure that always an agent will be available to take the next call, at the cost of having agents who are not handling any calls. More information here.
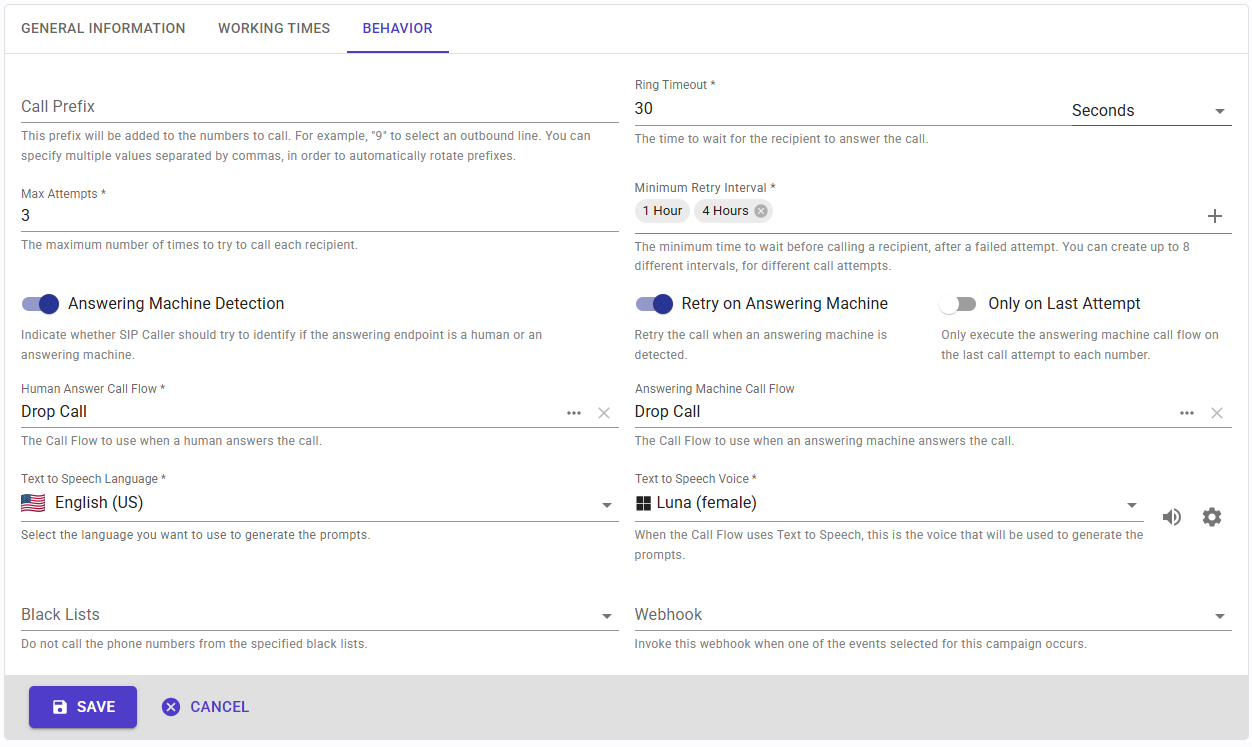
- Multiple Queues: this option will only be shown when the mode is set to “Progressive Dialer”. Enable this when SIP Caller must monitor multiple queues from your phone system for the same campaign.
- Queue: this option will only be shown when the mode is set to “Progressive Dialer”. When “Multiple Queues” is enabled, here you must enter a variable name that will contain the extension number of the queue to monitor for each number to call. Otherwise, this will be a drop down list from which you can select the queue to monitor.
- Agent Ready Confirmation: this option will only be shown when the mode is set to “Progressive Dialer”. You can ask the agent to press a DTMF key in order to accept the call. This is useful to avoid that an agent who is not ready to take a call accepts it by mistake, or the call goes accidentally to the agent's voicemail, and then SIP Caller initiates the call to the external number when it should not.
- Call Starting Confirmation: this option will only be shown when the mode is set to “Progressive Dialer”. You can play a prompt to the agent just before initiating the call to the external number, so the agent is aware that the call is going to be made.
- Display Text: this option will only be shown when the mode is set to “Progressive Dialer”. When using 3CX Phone System, SIP Caller can show custom text to the agent using the 3CX Web Client. The text specified here can have static and dynamic parts, using variables.
- Display URL: this option will only be shown when the mode is set to “Progressive Dialer”. When using 3CX Phone System, SIP Caller can show a custom URL to the agent using the 3CX Web Client. The URL specified here can have static and dynamic parts, using variables.
Call Handling
This tab is not shown when the campaign mode is “Progressive Dialer”, because in that case all the actions performed by SIP Caller are already defined, i.e. calling the agent and then calling the customer.
- Call Handling Mode: you can choose if you want the campaign to execute a “Call Flow”, or use an “AI Conversational Agent” to handle the call:
- In Call Flow call handling mode, SIP Caller will execute the desired call flow when the call is answered.
- In AI Conversational Agent call handling mode, SIP Caller will connect the call to the desired AI Agent to have a natural conversation.
- AI Conversational Agent: when the Call Handling Mode is “AI Conversational Agent”, you must select the AI Agent that will do the job. This must be previously created in the AI Agents section.
- Voicemail Detection Mode: this setting allows you to choose how you want to do the voicemail detection when executing campaigns in Call Flow mode. In some cases, calls should be transferred to a queue as soon as the destination answers the call, and waiting for the voicemail detection algorithm to complete is not convenient. In those cases, this can be disabled. You can also choose if you want to use the Standard algorithm, or a more powerful AI-Based algorithm.
- Voicemail Detection AI Agent: when the Voicemail Detection Mode is “AI-Based”, you must select the AI Agent that will do the job. This must be previously created in the AI Voicemail Detection Agents section.
- Call Flow: when the voicemail detection is disabled, SIP Caller will just ask for a single call flow to execute as soon as the call is answered. This could be for example a Transfer operation, so the call is immediately sent to an agent.
- Human Answer Call Flow: this setting is shown when the voicemail detection is enabled. SIP Caller uses real time speech analysis to automatically detect if the call is answered by a human or a voicemail. You can select the Call Flow to execute in each case. This is the Call Flow to execute when a human answers the call.
- Unknown Detection Treatment: specify how you want to treat calls where SIP Caller can't identify who answers the call. You can choose to execute the Human Answer call flow or the Voicemail call flow.
- Leave Voicemail Message: specify when you want to leave a voicemail. Options are:
- Never: when you just want to drop the call when a voicemail is detected.
- On First Detection: to leave a message only the first time a voicemail is detected for this number.
- On Last Attempt: to leave a message only in the last attempt calling this number.
- On Every Attempt: to leave a message every time a voicemail is detected.
- Voicemail Call Flow: this setting is shown when the voicemail detection is enabled. This is the Call Flow to execute when a voicemail is detected.
- Retry on Voicemail: you can use this setting to define if a call answered by a voicemail should be retried or not.
- Text to Speech Language: you can choose the language to use when selecting a voice for text to speech.
- Text to Speech Voice: you can choose the voice to use when converting text to speech. There are plenty of voices that you can use, in many different languages, from Google Cloud or Microsoft Azure. You can listen to the selected voice to know how it feels, right from the SIP Caller console.
Call Retries
- Max Attempts: the maximum number of times a number can be contacted, in case of failed attempts (destination busy, no answer, etc.). When running campaigns in “Progressive Dialer” mode, if the agent doesn't accept the call, it will be considered a failed attempt.
- Min Retry Interval: this is the minimum time interval between call attempts. For example, if you specify 1 hour, then the contact will not be called again during 1 hour after a failed attempt. However, the retry could take longer. You can define up to 8 different intervals, in case you need different wait times for different call attempts.
Integration
- Webhook: you can select a webhook to which SIP Caller will send event notifications related to this campaign.